


You will need to supply several accessories to successfully assemble a working Freeplay Zero into a GBA Shell or a Freeplay Zero Shell using this kit.
The DIY Kit Includes/Features
- Freeplay Zero Circuit Board with Onboard Built-in:
- USB-C Charging Port
- LCD Brightness Controller
- i2c SH 4-Pin (aka STEMMA QT / Qwiic JST) Expansion Port
- L2/R2 Button Support (simplifies the addition of extra shoulder buttons)
- Two Speaker Connectors (for connecting up to 2 speakers for mono/stereo sound)
- 4 Analog Inputs (for adding up to 2 analog sticks)
- 2 Additional Digital Inputs (in case you want to add center-click analog sticks)
- 3.5″ IPS 640×480 LCD
- 22-pin ZIF flexible ribbon cable (necessary to fully connect the RPi to the Freeplay Zero)
- Single/Mono Speaker
- 40-pin Header (to solder to your Raspberry Pi Zero*, Zero W, or Zero 2W)
- 2 Standoffs (for mounting your Raspberry Pi)
- Micro USB to USB Adapter (for connecting USB to your Raspberry Pi)
- X/Y Button Drill Guide (helps add X/Y buttons to a GBA shell)
- CPU Heatsink
Necessary Additions
- Freeplay Zero Shell (no modifications required) or GBA Shell (requires modifications)
- Raspberry Pi Zero 2W, Pi Zero*, Pi Zero W, or Pi Zero WH (H requires no soldering)
- Micro SD Card
- Full set of Rubber Button Pads (some shells include the pads or we carry them)
- Battery (we carry this perfect fit 2000mAh battery)
- Extra Set Of A/B Button Caps, if you are adding X/Y buttons
- Extra A/B Rubber Button Pad, if using silicone pads for X/Y buttons (we carry rubber button pad sets)
Optional Additions
- Second Speaker to add stereo sound
- HDMI Adapter (for playing on the big screen or testing your build before you use the built-in LCD)
- Tri-Wing Screwdriver (the GBA-style shells often use tri-wing screws)
Freeplay Zero DIY Kit X/Y Button Options

You can choose to not install X/Y buttons. That will make the shell modification process easier. If you choose to install X/Y buttons, you have 2 main options: silicone-rubber pad or rubber-nipple buttons. See the video to the right (which shows how to add X/Y buttons to the GBA shell for a Freeplay installation).
- The “silicone-rubber pad” method uses a second set of the normal A/B button caps and a second A/B silicone rubber pad from your GBA shell to create another 2 buttons. We now carry sets of the silicone-rubber pads here. You must create new holes in the shell and cut up the rubber pads. Note that you will need extra A/B button caps to implement this option. You will also need to move the speaker away from the bottom button to implement this option.
- The “rubber-nipple buttons” method uses a second set of the normal A/B button caps from your GBA shell and a set of 4 rubber-nipple buttons to create another 2 buttons. You must create new holes in the shell, modify the 2 sets of A/B button caps, and modify the existing A/B button holes in the shell. Note that you will need extra A/B button caps to implement this option. You will also need to move the speaker away from the bottom button to implement this option.
Soft-Rubber Feel X/Y Buttons
The DIY kit will come with 4 square-base rubber-nipple buttons (as shown in the photo below). If you want to build using the rubber pads instead, you will need to supply a second silicon-rubber A/B button pad (as shown in the photo below). You can choose which you would like to use for your build. The rubber-nipple buttons will need to be soldered on, if you choose to use them. If you choose to use the silicon-rubber pad, the build can be solderless.


 *Note about Raspberry Pi Zero Models
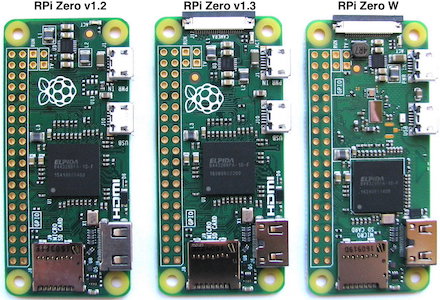 *Note about Raspberry Pi Zero Models
The Raspberry Pi Zero originally came out as “v1.2” and was fairly quickly replaced with “v1.3.” All Raspberry Pi Zero models (Zero, Zero W, Zero WH, Zero 2W) that have come out since the Pi Zero v1.3 have included a CSI camera port. The Freeplay Zero 640×480 Model uses this CSI camera port. As such, the Raspberry Pi Zero v1.2 (which is rather rare) will not work with the Freeplay Zero 640×480 Model. Please see the photo showing RPi Zero v1.2, v1.3, and W and notice that the v1.2 lacks the white CSI camera socket that is required for use with the Freeplay Zero. Make sure that your Raspberry Pi Zero has this white camera socket before purchasing the Freeplay Zero.
Reviews
There are no reviews yet.